Blackberry Software, Tool, Firmware free download here

Blackberry Software, Tool, Firmware free download here

Main Menu

Firmware Menu

Software / Repair Tool

Blackberry All In One tool free download here

This tool very use full tool for blackberry device and here not all are link working some link working very well so remember everyone who use this tool, in this tool tips and trick, software tool, firmwares but in three option many option include so user this tool for blackberry and also there forum support option but not all link working some link working.

GALAXY NOTE 4 WIKO RAINBOW MICROMAX A120 MYPHONE AGUARIO


NOTE 4 CROSSPORT from CHERRY INFINIX PURE MTK6592.

DO NOT USE MY WORK WITHOUT MY PERMISSION, FROM NOW ON I WILL REPORT ALL LINKS AND PORTS THAT YOU USE WITHOUT MY PERMISSION OR WITHOUT A LINK TO MY YOUTUBE VIDEO AND MY CREDITS.

INSTRUCTION TO NOTE 4 KITKAT ROM WIKO FIRMWARE:
1. You must be on WIKO base.
2. Boot into recovery and wipe/system, wipe/data. If you're on Philz recovery, choose clean to install a new ROM. wipe cache/ wipe dalvik cache
3. Now select Install zip and browse to the location where you have NOTE4WR.zip and install it.
4.reboot
5.go to recovery and apply ROOTFIX if you dont have root on 1 boot.
6.reboot.

DOWNLOADS:

NOTE 4 ROM:https://www.androidfilehost.com/?fid=23991606952611376

ROOT FIX:https://www.androidfilehost.com/?fid=23991606952606027

ORIGINAL THREAD HERE:http://forum.xda-developers.com/android/development/rom-galaxy-note-4-t3123970

PROBLEMS/BUGS:1-if having any problem with USB SEE HERE!!!  2-Proximity sensor not working.


Android Tool V1.1 By Dawood1208 Free download here

Android Tool V1.1 By Dawood1208 Free download here


Android Tool V1.1 By Dawood1208 Free download here

One click

Start/kill Adb server
List Devices
Reboot
Go Recovery
Go Download
Wipe Data in Adb/Fastboot Mode
Remove Password (Root Needed)
Remove Pattern (Root Needed)
Remove Gmail Account (Root Needed)

Zip Flasher

Select Zip File And send automatically to sdcard
And Send phone to Recovery Mode With instructions

App Installer (one click) 

Select apk file and it will install 

Utilities 

Full Key Tool ( Usefull incase your phone button not work :-O
Root Checker 
Permission Fixer

File Manager 

Shows All installed Apps 

Flasher (Fastboot Mode)

One Click Flash splash\Hboot\Recovery\Radio

Added 10 Different Themes

If you like my Work Donate - special gifts for who donates
Android Tool By Dawood1208
Credit to Mr. Dawood1208

Note : Internet Connection is Needed

EMUI V3.0 Wiko Rainbow,MyPhone Agua Rio,MicromaxA120 C2C

EMUI V3.0 ANDROID 4.4.2 for Wiko Rainbow,MyPhone Agua Rio,MicromaxA120 C2C,Explay Fresh ,QMobile i9,BLU Studio 5.0 C HD


3 test patches for EMUI v3 CAMERA PROBLEM, download here and report wich one is worked:https://docs.google.com/document/d/1MYTDlOzS0GdnQ1LltxNGk5DO9VNJA0H_87bQM14U3QU/edit?usp=sharing

REPORT BUGS HERE /YOUTUBE or XDA:http://forum.xda-developers.com/android/development/rom-emui-3-0-wiko-rainbow-micromax-a120-t3121821#post61040879

FEATURES-VIDEO PREVIEW HD HERE-https://www.youtube.com/watch?v=BmBiFJcfqKM

DUAL SIM
great CAMERA QUALITY
Mirror camera
magazine wallpaper
ULTRA saver mode with 5 functions only
Suberb battery backup
MULTILANGUAGE
startup manager
THEME support
BLOCKLIST support
DATA /TRAFFIC MANAGER
Mirror and Magnifier camera--nice one!!
optimization 1 click and more..

INSTALLATION FOR WIKO BASE FIRMWARE:

1. You must be on wiko base.
2. Boot into recovery and wipe/system, wipe/data. If you're on Philz recovery, choose clean to install a new ROM. wipe cache/ wipe dalvik cache
3. Now select Install zip and browse to the location where you have EMUIV3_WR.zip and install it.flash EMUI PATCH
4.reboot
5.go to recovery and apply ROOTFIX if you dont have root on 1 boot.
6.reboot.


DOWNLOADS:
EMUI V3 WR ROM:https://www.androidfilehost.com/?fid=23991606952611255
EMUI PATCH:https://www.androidfilehost.com/?fid=23991606952611427
ROOT FIX:https://www.androidfilehost.com/?fid=96042739161891898

DO NOT USE MY WORK WITHOUT MY PERMISSION, FROM NOW ON I WILL REPORT ALL LINKS AND PORTS THAT YOU USE WITHOUT MY PERMISSION OR WITHOUT A LINK TO MY YOUTUBE VIDEO AND MY CREDITS.

Karbonn A15 Flash done with Firmware free download here

Karbonn A15 Flash done with Firmware free download here

This tutorial for Karbonn A15 android device and in this cpu are different not mtk or spd cpu so carefully following this tutorial, you can use this tutorial when your device goes to pattern lock, screen lock, security lock then use this tutorial but remember before use this tutorial you can't save data like contacts, photos, videos, notes etc because this is factory reset firmware so remember all are mention after use this tutorial and also must remember check micro usb cable and device battery must charged battery up to 70% this is most impotent in flash and also check driver of fastboot mode because if not installed driver so you can't detect with flash tool so must impotent this also so i mean above mention for flash remember, now lets go how to flash Karbonn A15 android device in flash tool.
Karbonn A15 Firmware Download here

Karbon A15 Tool Download here

Required for Karbonn A15 Flash:

1. Karbonn A15 Device with well battery charged
2. Karbonn A15 Firmware or Toool
3. Micro USB cable
4. Computer or Laptop

Procedure:

1. Download Firmware or Tool from above link
2. Extract to desktop or as you like path
3. Open AP folder and open QUALFAST1.0.7 exe
4. Click on Set Path and choose 592230_8574_V0336 folder
5. Press and hold Volume Up + Power button until your device goes Fastboot mode
6. Attach Device
7. Install Fastboot driver
8. Press Ok button
9. Wait until full flash
10. You are done from flashing

Karbonn A15 Flash done Screenshot:


GALAXY NOTE 4 WIKO RAINBOW /MICROMAX A120 /MYPHONE AGUARIO

hi all, just coming to present you my next projects for WIKO RAINBOW KITKAT FIRMWARE..

GALAXY NOTE 4 KITKAT:

DUAL SIM
DUAL SIM MESSAGES
NOTE 4 STYLE

still in tests but booting already and working..it will take a bit time yet cause its a port from MTK6592 so some features need more work..so a small presentation.


DOWNLOAD READY IN MY BLOG, 01-06-2015.

More than 100 Keyboard Shortcuts must read & Share

More than 100 Keyboard Shortcuts must read & Share


Keyboard Shortcuts (Microsoft Windows)

1. CTRL+C (Copy)
2. CTRL+X (Cut)
... 3. CTRL+V (Paste)
4. CTRL+Z (Undo)
5. DELETE (Delete)
6. SHIFT+DELETE (Delete the selected item permanently without placing the item in the Recycle Bin)
7. CTRL while dragging an item (Copy the selected item)
8. CTRL+SHIFT while dragging an item (Create a shortcut to the selected item)
9. F2 key (Rename the selected item)
10. CTRL+RIGHT ARROW (Move the insertion point to the beginning of the next word)
11. CTRL+LEFT ARROW (Move the insertion point to the beginning of the previous word)
12. CTRL+DOWN ARROW (Move the insertion point to the beginning of the next paragraph)
13. CTRL+UP ARROW (Move the insertion point to the beginning of the previous paragraph)
14. CTRL+SHIFT with any of the arrow keys (Highlight a block of text)
SHIFT with any of the arrow keys (Select more than one item in a window or on the desktop, or select text in a document)
15. CTRL+A (Select all)
16. F3 key (Search for a file or a folder)
17. ALT+ENTER (View the properties for the selected item)
18. ALT+F4 (Close the active item, or quit the active program)
19. ALT+ENTER (Display the properties of the selected object)
20. ALT+SPACEBAR (Open the shortcut menu for the active window)
21. CTRL+F4 (Close the active document in programs that enable you to have multiple documents opensimultaneously)
22. ALT+TAB (Switch between the open items)
23. ALT+ESC (Cycle through items in the order that they had been opened)
24. F6 key (Cycle through the screen elements in a window or on the desktop)
25. F4 key (Display the Address bar list in My Computer or Windows Explorer)
26. SHIFT+F10 (Display the shortcut menu for the selected item)
27. ALT+SPACEBAR (Display the System menu for the active window)
28. CTRL+ESC (Display the Start menu)
29. ALT+Underlined letter in a menu name (Display the corresponding menu) Underlined letter in a command name on an open menu (Perform the corresponding command)
30. F10 key (Activate the menu bar in the active program)
31. RIGHT ARROW (Open the next menu to the right, or open a submenu)
32. LEFT ARROW (Open the next menu to the left, or close a submenu)
33. F5 key (Update the active window)
34. BACKSPACE (View the folder onelevel up in My Computer or Windows Explorer)
35. ESC (Cancel the current task)
36. SHIFT when you insert a CD-ROMinto the CD-ROM drive (Prevent the CD-ROM from automatically playing)

Dialog Box - Keyboard Shortcuts

1. CTRL+TAB (Move forward through the tabs)
2. CTRL+SHIFT+TAB (Move backward through the tabs)
3. TAB (Move forward through the options)
4. SHIFT+TAB (Move backward through the options)
5. ALT+Underlined letter (Perform the corresponding command or select the corresponding option)
6. ENTER (Perform the command for the active option or button)
7. SPACEBAR (Select or clear the check box if the active option is a check box)
8. Arrow keys (Select a button if the active option is a group of option buttons)
9. F1 key (Display Help)
10. F4 key (Display the items in the active list)
11. BACKSPACE (Open a folder one level up if a folder is selected in the Save As or Open dialog box)

Microsoft Natural Keyboard Shortcuts

1. Windows Logo (Display or hide the Start menu)
2. Windows Logo+BREAK (Display the System Properties dialog box)
3. Windows Logo+D (Display the desktop)
4. Windows Logo+M (Minimize all of the windows)
5. Windows Logo+SHIFT+M (Restorethe minimized windows)
6. Windows Logo+E (Open My Computer)
7. Windows Logo+F (Search for a file or a folder)
8. CTRL+Windows Logo+F (Search for computers)
9. Windows Logo+F1 (Display Windows Help)
10. Windows Logo+ L (Lock the keyboard)
11. Windows Logo+R (Open the Run dialog box)
12. Windows Logo+U (Open Utility Manager)
13. Accessibility Keyboard Shortcuts
14. Right SHIFT for eight seconds (Switch FilterKeys either on or off)
15. Left ALT+left SHIFT+PRINT SCREEN (Switch High Contrast either on or off)
16. Left ALT+left SHIFT+NUM LOCK (Switch the MouseKeys either on or off)
17. SHIFT five times (Switch the StickyKeys either on or off)
18. NUM LOCK for five seconds (Switch the ToggleKeys either on or off)
19. Windows Logo +U (Open Utility Manager)
20. Windows Explorer Keyboard Shortcuts
21. END (Display the bottom of the active window)
22. HOME (Display the top of the active window)
23. NUM LOCK+Asterisk sign (*) (Display all of the subfolders that are under the selected folder)
24. NUM LOCK+Plus sign (+) (Display the contents of the selected folder)

MMC Console keyboard shortcuts

1. SHIFT+F10 (Display the Action shortcut menu for the selected item)
2. F1 key (Open the Help topic, if any, for the selected item)
3. F5 key (Update the content of all console windows)
4. CTRL+F10 (Maximize the active console window)
5. CTRL+F5 (Restore the active console window)
6. ALT+ENTER (Display the Properties dialog box, if any, for theselected item)
7. F2 key (Rename the selected item)
8. CTRL+F4 (Close the active console window. When a console has only one console window, this shortcut closes the console)

Remote Desktop Connection Navigation

1. CTRL+ALT+END (Open the Microsoft Windows NT Security dialog box)
2. ALT+PAGE UP (Switch between programs from left to right)
3. ALT+PAGE DOWN (Switch between programs from right to left)
4. ALT+INSERT (Cycle through the programs in most recently used order)
5. ALT+HOME (Display the Start menu)
6. CTRL+ALT+BREAK (Switch the client computer between a window and a full screen)
7. ALT+DELETE (Display the Windows menu)
8. CTRL+ALT+Minus sign (-) (Place a snapshot of the active window in the client on the Terminal server clipboard and provide the same functionality as pressing PRINT SCREEN on a local computer.)
9. CTRL+ALT+Plus sign (+) (Place asnapshot of the entire client window area on the Terminal server clipboardand provide the same functionality aspressing ALT+PRINT SCREEN on a local computer.)

Microsoft Internet Explorer Keyboard Shortcuts

1. CTRL+B (Open the Organize Favorites dialog box)
2. CTRL+E (Open the Search bar)
3. CTRL+F (Start the Find utility)
4. CTRL+H (Open the History bar)
5. CTRL+I (Open the Favorites bar)
6. CTRL+L (Open the Open dialog box)
7. CTRL+N (Start another instance of the browser with the same Web address)
8. CTRL+O (Open the Open dialog box,the same as CTRL+L)
9. CTRL+P (Open the Print dialog box)
10. CTRL+R (Update the current Web page)
11. CTRL+W (Close the current window)

Intex Aqua Xtreme Flash done with Firmware free download here

Intex Aqua Xtreme Flash done with Firmware free download here

This tutorial tested by me without any risk and also no need to any box for flash just download firmware or tool and you are done for free, this tutorial you can following when you have to issue pattern unlock, screen lock, security lock, restarting issue, hang on logo issue, dead issue then you can using this tutorial but before following must remember you can't save data like contacts, notes, photos, videos etc because this is factory firmware so you can't save data must read full tutorial after following this tutorial and also before flash check micro usb cable or device battery because most impotent in flash if any problem in both of mention so stop between flash so remember all are mention for flash, now lets go how to flash Intex Aqua Xtreme android device in flash tool.

Intex Aqua Xtreme V09 Firmware Download here

Intex Aqua Xtreme V11 Firmware Download here

Required for Intex Aqua Xtreme flashing:

1. Intex Aqua Xtreme Android Device with Battery charged up to 70%
2. Intex Aqua Xtreme Firmware
3. Micro USB cable
4. Computer or Laptop

Procedure:

1. Download Firmware or Extract to desktop or as you like path
2. Open SP tool
3. Click on Scatter button and choose file from firmware folder
4. Click on Download button
5. Press and hold Volume Up button and insert usb cable
6. Wait until flash done
7. You are done
Intex Aqua Xtreme Flash done in sp tool screenshot:

STOCK ROM EVERCOSS A80A ( ELEVATE Y2)

OFFICIAL FROM EVERCOSS A80A ELEVATE Y2 KITKAT

Symphony New Version Flash File E25_1_XXX_V01.5_UP19_V1.0 Android 4.4.2 KitKat 100% Worked Free Download

Symphony New Version Flash File 100% ok


E25_1_XXX_V01.5_UP19_V1.0
E25_0_XXX_V01.6_UP19_V1.0
Android 4.4.2 KitKat
1.3 GHz Quad Core
MTK6572M
Download

Without Password

GPS FIX for KITKAT ROMS WIKO RAINBOW FIRMWARE


Hi all, finally i found a solution to fix GPS on all my custom kitkat roms..less than 5 minutes and you are ready to go..i ve tested in COLOR OS , MIUI 6 and SLIMPOP v2..working 100%. So lets begin the tutorial:


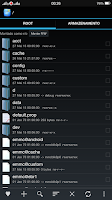
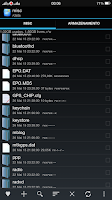
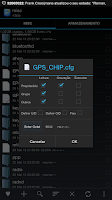
1-COPY GPS to data\nvram\APCFG\APRDEB and paste here. give permissions like in the image


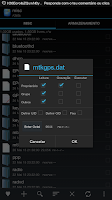
2-COPY GPS_CHIP.cfg and mtkgps.dat to

data\misc and give permissions like in the pictures


give root permissions and click on link to download BUSYBOX from google store:https://play.google.com/store/apps/details?id=stericson.busybox&hl=en install it and return to MTK EPO GPS FIXER and click on UPDATE EPO


4-reboot. you now have GPS working.


DOWNLOAD GPS FILES:https://www.androidfilehost.com/?fid=23991606952610828

thanks to smokermanXDA and old-geek.


Samsung E2202 sim restricted, Flash, Imei Repair done 100% tested by me

Samsung E2202 sim restricted, Flash, Imei Repair done 100% tested by me

This tutorial tested by me. First i flash in z3x with many flash files done but after start phone then show sim restricted, but i try in miracle box and flash it so flash success done phone working very well but i can't repair imei in miracle box or volcano box because this is read flash file after i try z3x for imei repair so its done old version, i mean i try last two days after i done this job so here i put every link is tested or also screenshot its done by me so remember first before flash first check your device battery its must charged up to 70% so now let's go how to flash Samsung E2202 in volcano box or how to imei repair Samsung E2202 in z3x box.

Samsung E2202 flash file tested download here

Required for this tutorial:

1. Samsung E2202 device with well battery charged
2. Miracle box or Volcano box
3. Z3x box
4. Micro usb cable
5. Computer or Laptop

Procedure for Flash:

1. Download flash file from above link
2. Open Miracle box
3. Choose spd tab
4. Click on Write button
5. Choose flash file to downloaded from above link
6. Change Comport Baudrate  921600 to 460800
7. Click on USB cable button
8. Now Click on Start button
9. Press and hold Music key (center) and insert usb cable
10. You are done from flashing

Procedure for Imei repair:

1. Open Z3x box and open Samsung Tool
2. Choose model E2202
3. Go to Repair Option and Tick on At Mode
4. Click on Repair and fill legally imei and click ok button
5. Press and hold Music key (center) and insert usb cable
6. You are done
Samsung E2202 repair imei in z3x box screenshot:

HTC DESIRE WIKO RAINBOW / MICROMAX A120 /MYPHONE AGUARIO

Wiko Rainbow,MyPhone Agua Rio,MicromaxA120 C2C,Explay Fresh ,QMobile i9,BLU Studio 5.0 C HD


HOW TO INSTALL : PHILZ RECOVERY)
-CLEAN INSTALL A NEW ROM
-WIPE CACHE
-WIPE DALVIK/ART CACHE
-INSTALL HTC DESIRE
-INSTALL ROOT AND YOUR DONE


changelog here:https://docs.google.com/document/d/1h0oPXPx1oGDvhegoN7fL5APcmD8vSYxHxg3TydHC2yg/edit?usp=sharing

DOWNLOADS:
HTC DESIRE ROM:https://onedrive.live.com/?cid=8f11de6ef5728432&id=8F11DE6EF5728432%21115&ithint=file,zip&authkey=!ABP4UjhwBy3fopU
ROOT:https://docs.google.com/file/d/0B1UbNaWJbFYVRXRyTXh1MjNhNFE/edit

TO DISABLE NAVIGATION BAR ADD THIS LINE IN BUILD PROP:qemu.hw.mainkeys = 1
credits: KENZUZIE,EXTREME PORTING TEAM.

MEDIA PAD MT6582 Official Firmware 100% ok Free Download

MEDIA PAD MT6582 Official Firmware 100% ok
[​IMG]
[​IMG]
Download
Without Password​

Micromax Official Firmwares Free download here

Micromax Official Firmwares Free download here


Micromax A064 Factory Firmware
Download here

Micromax A065 Factory Firmware
Download here

Micromax A068 Factory Firmware
Download here

Micromax A069 Factory Firmware
Download here

Micromax A075 Factory Firmware
Download V1.1.4 here
Download V1.1.5 here

Micromax A082 Factory Firmware
Download here

Micromax A089 Factory Firmware
Download here

Micromax A091 Factory Firmware
Download here

Micromax A092 Factory Firmware
Download here

Micromax A093 Factory Firmware
Download here

Micromax A100 Factory Firmware
Download here

Miicromax A101 Factory Firmware
Download here

Micromax A102 Factory Firmware
Download V8_0_6 (4GB+512MB) here
Download V8_1_9 (4GB+512MB) here
Download V8_1_C (4GB+512MB) here
Download 13-6-2014_(4GB+1GB) here
Download V8_2_5 (8GB+1GB) here

Micromax A104 Factory Firmware
Download here

Micromax A105 Factory Firmware
Download here

Micromax A106 Factory Firmware
Download here
Download here

Micromax A108 Factory Firmware
Download here

Micromax A110 Factory Firmware
Download here

Micromax A110Q Factory Firmware
Download here

Micromax A111 Factory Firmware
Download here

Micromax A113 Factory Firmware
Download here

Micromax A114 Factory Firmware
Download here

Micromax A114R Factory Firmware
Download here

Micromax A115 Factory Firmware
Download here

Micromax A116 Factory Firmware
Download here

Micromax A116i Factory Firmware
Download here

Micromax A117 Factory Firmware
Download here

Micromax A119 Factory Firmware
Download here

Micromax A120 Factory Firmware
Download here

Micromax A121 Factory Firmware
Download here

Micromax A177 Factory Firmware
Download here Datebase file here

Micromax A190 Factory Firmware
Download here

Micromax A200 Factory Firmware
Download here

Micromax A210 Factory Firmware
Micromax_A210_V1_290613 Download here
Micromax_A210_V16_210214 Download here

Micromax A24 Factory Firmware
Micromax_A24_Foreign_V1.2.1 Download here
Micromax_A24_Foreign_V1.2.7 Download here

Micromax A240 Factory Firmware
Micromax_A240_V1_110713 download here
Micromax_A240_V2_121214 download here

Micromax A25 Factory Firmware
Micromax_A24_Foreign_V1.2.1 download here
Micromax_A24_Foreign_V1.2.7 download here

Micromax A250 Factory Firmware
Micromax_A250_V1_27.09.2013 download here
Micromax_A250_V2_08.11.2013 download here
Micromax_A250_V3_21.11.2013 download here
Micromax_A250_V4_16.01.2014 download here
Micromax_A250_V5_23.07.2014 download here

Micromax A26 Factory Firmware
Micromax_A26_FOREIGN_V2.0.5 download here
Micromax_A26_FOREIGN_V2.0.9 download here

Micromax A27 Factory Firmware
Micromax_A27_ZE25PAA_060A_V8_0_7 download here
Micromax_A27_ZE25PAA_060A_V8_0_7_Ninja_Logo download here
Micromax_A27_ZE25PAA_060A_V8_0_J Download here
Micromax_A27_ZE25PAA_060A_V8_0_Q download here

Micromax A28 Factory Firmware
Micromax_A28_ZE230PAA_060A_V8_0_0 download here

Micromax A290 Factory Firmware
Micromax_A290_V2_22.08.14 Download here
Micromax_A290_V3_09.10.14 Download here

Micromax A30 Factory Firmware
Download here

Micromax A300 Factory Firmware
Download here

Micromax A310 Factory Firmware
Download here

Micromax A34 Factory Firmware
Download here

Micromax A35 Factory Firmware
Download here

Micromax A350 Factory Firmware
Download here

Micromax A40 Factory Firmware
Download here

Micromax A44 Factory Firmware
Download here

Micromax A45 Factory Firmware
Download here

Micromax A46 Factory Firmware
Download here

Micromax A47 Factory Firmware
Download here

Micromax A50 Factory Firmware
Download here

Micromax A51 Factory Firmware
Download here

Micromax A52 Factory Firmware
Download here

Micromax A54 Factory Firmware
Download here

Micromax A55 Factory Firmware
Download here

Micromax A56 Factory Firmware
Download here

Micromax A57 Factory Firmware
Download here

Micromax A58 Factory Firmware
Download here

Micromax A59 Factory Firmware
Download here

Micromax A61 Factory Firmware
Download here

Micromax A62 Factory Firmware
Download here

Micromax A63 Factory Firmware
Download here

Micromax A65 Factory Firmware
Download here

Micromax A66 Factory Firmware
Micromax_A66_44_V18_20131126_USR HERE
Micromax_A66_44_V20_20140212_USR HERE
Micromax_A66_J0A930P0711_GST_A93_W862_MMX_A66_44_V21_20140326_USR HERE

Micromax A67 Factory Firmware
Download here

Micromax A68 Factory Firmware
Download here

Micromax A69 Factory Firmware
Download here

Micromax A71 Factory Firmware
Download here

Micromax A72 Factory Firmware
Download here

Micromax A73 Factory Firmware
Download here

Micromax A74 Factory Firmware
Download here

Micromax A75 Factory Firmware
Download here

Micromax A76 Factory Firmware
Download here

Micromax A77 Factory Firmware
Download here

Micromax A78 Factory Firmware
Download here

Micromax A80 Factory Firmware
Download here

Micromax A84 Factory Firmware
Download here

Micromax A85 Factory Firmware
Download here

Micromax A86 Factory Firmware
Download here

Micromax A87 Factory Firmware
Download here

Micromax A88 Factory Firmware
Download here

Micromax A89 Factory Firmware
Download here

Micromax A90 Factory Firmware
Download here

Micromax A90S Factory Firmware
Download here

Micromax A91 Factory Firmware
Download here

Micromax A92 Factory Firmware
Download here

Micromax A93 Factory Firmware
Download here

Micromax A94 Factory Firmware
Download here

Micromax A96 Factory Firmware
Download here

Micromax AE90 Factory Firmware
Download here

Micromax AQ4501 Factory Firmware
Download here

Micromax EG111 Factory Firmware
Download here

Micromax EG116 Factory Firmware
Download here

Micromax EG333 Factory Firmware
Download here

Micromax MT500 Factory Firmware
Download here

Micromax P250 Factory Firmware
Download here

Micromax P255 Factory Firmware
Download here

Micromax P256 Factory Firmware
Download here

Micromax P275 Factory Firmware
Download here

Micromax P280 Factory Firmware
Download here

Micromax P300 Factory Firmware
Download here

Micromax P310 Factory Firmware
Download here

Micromax P350 Factory Firmware
Download here

Micromax P360 Factory Firmware
Download here

Micromax P362 Factory Firmware
Download here

Micromax P365 Factory Firmware
Download here

Micromax P410 Factory Firmware
Download here

Micromax P410i Factory Firmware
Download here

Micromax P500 Factory Firmware
Download here

Micromax P560 Factory Firmware
Download here

Micromax P580 Factory Firmware
Download here

Micromax P600 Factory Firmware
Download here

Micromax P650 Factory Firmware
Download here

Micromax P650E Factory Firmware
Download here

Micromax W121 Factory Firmware
Download here

FIX IMEI WIKO RAINBOW / MICROMAX A120 /MYPHONE AGUARIO

Myphone Agua Rio, Micromax Canvas 2 Colours a120, Wiko Rainbow, Explay Fresh, Blu Studio 5.0 C HD, and QMobile i9 ---THIS SCATTER.TXT IS ONLY FOR THESE PHONES.


Hi all , this is a different method to fix your IMEI ..many users that flash roms have the annoying WiFi NVRAM WARNING err 0x10 and they lost they IMEI..and each time they flash a rom the error comes back..so how to fix it?


EXTRACT THE RAR
  1. SP FLASHTOOLS:
  2. download scatter.txt
  3. use your nvram.emmc.bin.(that file inside the rom is a example file.if you dont have any try)