Mystic OS V3 WIKO RAINBOW MICROMAXA120 MYPHONE AGUARIO


INSTALLATION FOR WIKO RAINBOW FIRMWARE:

use my TWRP or PHILZ RECOVERY
wipe data/factory reset
wipe cache/wipe dalvik cache
install rom from SD CARD
FLASH BOOTLOGO:DOWNLOAD BOOTLOGO FOR ALL DEVICES
reboot, enjoy this amazing rom.

DOWNLOADS:
Micromax Fire 2 (A104) (Mt6582) - DOWNLOADDownload (Google drive)

Micromax Unite 2  (A106) (Mt6582) - Download (Google drive)

Acer Liquid Z500 (Mt6582) (Ported by Michael Jay) -Download (Mega)

Wiko Rainbow (Mt6582) - Download ROM 

Flare S2/ XOLO Q700S(Mt6582) (Ported by Dane Cruz) - Download (Google drive)

Tecno H6 (Mt6582) (Ported by Nii Abe Abbey) -Download (Google drive)[/URL]

Micromax Canvas Magnus A117 (Mt6589) (Ported by @They_One )
-Go to His thread :)


original thread here by Raj:http://forum.xda-developers.com/android/development/rom-t3184945

Htc Desire 820Q Firmware download here

Htc Desire 820Q Firmware download here


Download link

Htc Desire 820Q A50_DTUL (Asia india cid_38 v1.01.720.2) here

HTC Desire 516, HTC D516h,HTC D516w Firmware download here

HTC Desire 516, HTC D516h,HTC D516w Firmware download here

Note : Flash via sdcard

HTC Desire 516, HTC D516h (V2_DUG_JB 4.3 asia india 1.10.708.001) here
HTC Desire 516, HTC D516w (V2 DCG JB 4.3 asia india 1.04.720.001) here
HTC Desire 516, HTC D516h (Europe V2_DCG_JB43 1.07.401.001) here

HTC Desire 516 dual sim Hard Reset or Pattern Unlock done

HTC Desire 516 dual sim Hard Reset or Pattern Unlock done


This tutorial tested by me without any risk, just need to remember some impotent notes for data, if you use this tutorial then remember first if you use this tutorial then you can't save data like contacts, mp3, videos, photos because this is factory reset so remember this topic because impotent this step and also check your device battery if low so you can't use this tutorial and check also volume up and down key and power because if this tutorial use then need to three keys for hard reset. You can done problem like Pattern lock, restarting problem, hang on logo, security lock from this tutorial.

Procedure:

1. Take out battery into device
2. Insert battery into device
3. Press and hold Volume Up + Power key until recovery menu

4. Now Choose "wipe data/factory reset" option from volume down key and press Power key
5. Now choose "Yes -- delete all user data" from volume down key and then press power key

6. Reboot your device choose "reboot system now" and then press power key
7. You are done

Micromax Canvas 4 A210 Flash done with Firmware free download here

Micromax Canvas 4 A210 Flash done with Firmware free download here

Must Read:
This flash file tested by me without any error working well,  you can use this flash file when your device hang on logo problem, restarting problem, security lock problem, password lock problem, pattern lock problem etc software related problem and you can use this tutorial without any box and this is free for all who know about software in mobile, impotent for flashing first must check your micro usb cable if not good then you can't flash it so check micro usb cable second check your device battery that is impotent for flashing if your device battery low so stop your device between flash so this is impotent for flash, before you flash save your data like contact, photos, videos etc because this is factory flash file so you can't save after full flash so must remember all are impotent notes.

Micromax Canvas 4 A210 Firmware download here

Required for flash:

1. Micromax Canvas 4 A210 device with battery charged
2. Micromax Canvas 4 A210 tested firmware or Tool
3. Micro usb cable
4. Computer or Laptop

Procedure:

1. Download Firmware from above link
2. Open Flash tool
3. Click on Scatter-loading button and choose MT6589_Android_scatter_emmc file
4. Now Click on Download button
5. Press and Hold Volume UP key and insert usb cable
6. Wait until full flash
7. You are done

Micromax Canvas 4 A210 Flash done Screenshot:

STOCK ROM ADVAN S4P

Official ROM ADVAN S4P 4.4.2


WG4027_S4P_V1.6_20150616 – scx35_sp7731  4.4.2 KOT49
http://adf.ly/1NVBaJ
 PASWORD RAR : berbagikoleksi.blogspot.com

STOCKROM ADVAN S50F

FIRMWARE ADVAN S50F OFFICIAL


ROM ADVAN S50F Version:

S50F_TCS5022B_S100_A1_SP7731_V1.1_20150617 
http://adf.ly/1NVAs6

S50F_TCS5022B_S100_A1_SP7731_V1.1_20150610
http://adf.ly/1NVAf9

S50F_TCS5022B_S100_A1_SP7731_V1.1_20150521
http://adf.ly/1NVAzE

S50F_TCS5022B_S100_A1_SP7731_V1.1_20150507
http://adf.ly/1NVB4M

S50F_TCS5022B_S100_A1_SP7731_V1.0_20150413 
 http://adf.ly/1NVB7l
 
PASSWORD RAR: berbagikoleksi.blogspot.com


STOCK ROM ADVAN S5Q OFFICIAL

Official ROM ADVAN S5Q MT6592


S507_A1_Q5321_4.4.2_V0.1_20141022 – KOT49H – ratech92_cwet_rlk_kk
http://adf.ly/1NV8xC
 PASSWORD RAR: berbagikoleksi.blogspot.com

STOCK ROM ADVAN S5J+ PLUS

Official ROM Advan S5J+ 


WG5009_S5J+_R07_20141206 - KOT49H - j11w-gw-wg5009-2100-fwvga-wg-64g8g-kk
http://adf.ly/1NV1cV 
 
SP FLASH TOOL
http://adf.ly/1NV1cV
 

Samsung C5010 Squash 3G Flash done

Samsung C5010 Squash 3G Flash done


This flash file tested by me without any error working well,  you can use this flash file when your device hang on logo problem, restarting problem, security lock problem, password lock problem, pattern lock problem etc software related problem and you can use this tutorial without any box and this is free for all who know about software in mobile, impotent for flashing first must check your micro usb cable if not good then you can't flash it so check micro usb cable second check your device battery that is impotent for flashing if your device battery low so stop your device between flash so this is impotent for flash, before you flash save your data like contact, photos, videos etc because this is factory flash file so you can't save after full flash so must remember all are impotent notes.

Samsung C5010DDJE5 (tested) Flash file Download here

Required for flash:

1. Samsung C5010 Squash 3G phone
2. Samsung C5010 Squash 3G's tested flash file
3. UFS (HWK) box
4. RJ45 Cable
5. Computer or Laptop

Procedure:

1. Open SAMs software (for samsung device)
2. Click on Connect button
3. Choose Swift Option
4. After Choose correct model (C5010)
5. Click on PTT File and choose  C5010DDJE5.ptt file
6. Connect phone with RJ45 cable with battery or without battery
7. Now Click on Write Flash button
8. Wait until full flash
9. You are done

Samsung C5010 Squash 3G Flash done screenshot:

How To Flash ATM(XXX) Chip With ACTIONS Pad Product Tool Guide

How To Flash & Update ATM Chip With ACTIONS Pad Product Tool

  ACTIONS Pad Product Tool_V1.06.02.rar

How To Flash ATM Chip With ACTIONS Pad Product Tool

  • Open ACTIONS Pad Product Tool
  • Connect Your tablet To Boot Mode () Boot Mode - Press Volume and Connect tablet to PC
  • Choice Fw and Click Replace
  • Click to Download
  • Wait ... For Successful
  • That's It
Tested Report - ATM Chip}-TW_J0711_v40 Successfully Flashing Done With Original Fw
 ATM Chip}-TW_J0711_v40 Successfully Flashing Done With Original Fw

ACTIONS Pad Product Tool_V1.06.02.rar
F1120-WK-TWD-0308+0329像夓åø¦ēÆHDMI20140326.rar
Boot Mode - Press Volume and Connect tablet to PC
Password : fphone

How To Repair imei A20,a13,a10,Mtk cpus supported Tablet Device Guide

Advance Tablet imei repair tools V1.0
supported allwinner A20 cpu
supported allwinner a10 cpu
supported allwinner a13 cpu
supported Mtk 6572,65xx cpu
suppotred allwinner 2g modem imei writing
supported allwinner 3g modem imei writing
Different imei writing tools for different modem version


note : All tools need usb debugging on

For any tablet imei repair

How to use :
A1 & a2 : Click a1 topwise_F761k_761l_761s service Adb copy or extract Dragonface_v10 folder to desktop > open folder and deagonface.exe,now close advance tablet imei tools and open tool aagin now click a2 a13 modems1190-m0228 (topwise_F761k_761l_761s) then connect tablet and repair


2 : just click and fill the box imei digit press write

3 : click to any tools
according matches su al modem device enter 15 digit imei in cmd tool press enter then restart device and check
DOWNLOaD

HowTo Update Allwinner A23 CPU devices Using [PhoenixUsbPro] Flashing Guide

 HowTo Update Allwinner A23 CPU devices Using [PhoenixUsbPro] Flashing Guide
Things you may Need (The ones marked with a * are not optional):
- Stock firmware ROM*
- PhoenixSuit Key*
- PhoenixUSBPro* (Even if people keep calling it PhoenixSuit, thats its name when you install it)
- Semi-bricked Tablet* (Stuck on Logo, Cant enter recovery, etc.)
- Windows XP x86 or Windows 7 x86 / x62 *
- Patience**

This is a READ FIRST and READ-WHILE-ON-IT tutorial, Make sure to READ IT FIRST and then you can read it while youre doing it. If you attempt to do it while youre reading it without reading it first you'll be propense to make tedious mistakes.

Let's get on it.

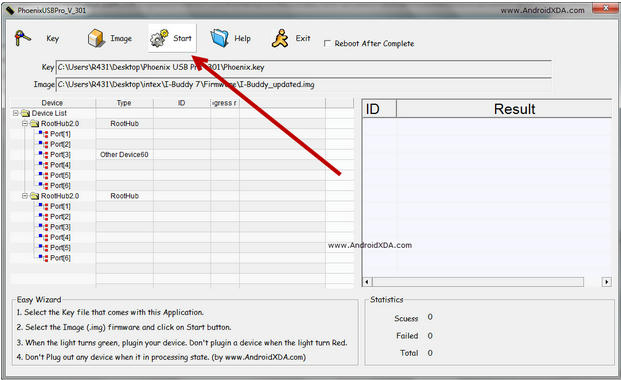
Install PhoenixUSBPro and once its installed, open it.
Phoenix is just like livesuit but they have a bigger interface, youll see the task buttons on top:
Key file | Image | Debug View | Start | Help | Update | Exit | []reboot
below it shows your USB Hub status (internal and external)
and on the right side theres a box to hold your failed or succededly flashed devices.

DONT connect your tablet yet.

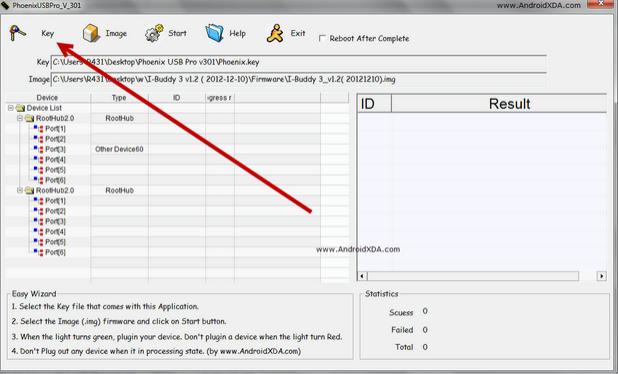
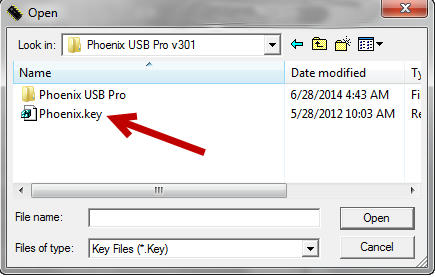
Press the key file button and navigate to where your Key file is and double click on it to select it.
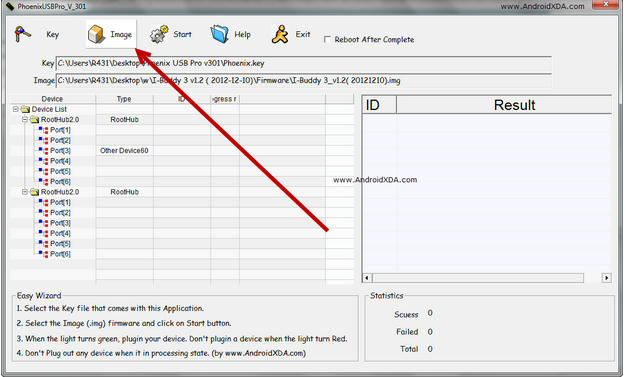
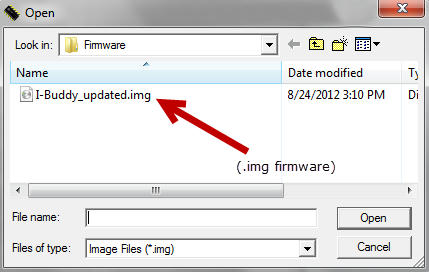
Press the Image button and navigate to where your *.IMG Stock firmware rom file is and double click on it to select it.

Youll see a (X) red Icon on the right. Dont mind it yet.

DONT connect your tablet yet.

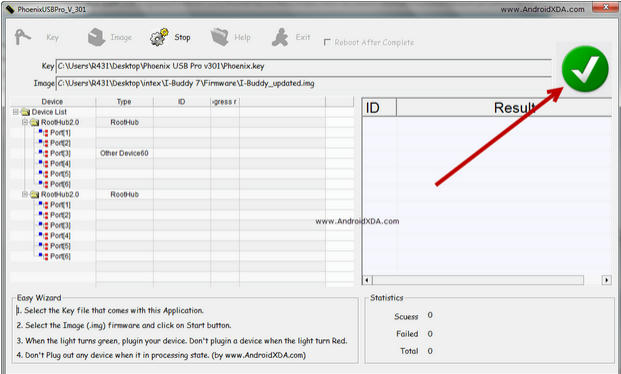
Press Start. The red Icon should have turned to GREEN. If it didnt, something went wrong, they key file or the *.IMG rom file are damaged, corrupted, downloaded wrong or they are invalid. Search for a working ROM or start again the tutorial.
(Most of the times it should do just fine).

after the Icon has turned green, we are ready to connect our device.
First connect your USB Cable to your computer and leave your tablet disconnected
Make sure your tablet is completely turned off.
Before connecting your tablet, press the Volume+ button (or search your device's FEL Button on google / Linux-sunxi) for the Q88Pro, and Q8H is Volume+, probably for others the same.
Ok, Hold the Volume+ button pressed down and connect your USB Cable to your Tablet (While holding the Volume+ button down).
Right after connecting your USB Cable into your tablet (without releasing the Volume+ Button) Start pressing your POWER button repeatedly, One time every second.
At the sixth time (for some devices you need to press it 10 times or more) it will pop in your USB Hub interface box a device. Wait a few and it will appear your connected tablet.
It will say: Your device's queued ID and the process percent.
Mostly starts fast til 7% and then it continues to 53% then it does the job.
It'll take about 2"5 mins so be patient I know you want your tablet restored.

After its done it will appear on the right box if it succeeded or failed and the time the flashing took.
now you can press Stop and disconnect your tablet.

In the FEL Mode, even if your tablets screen is deep black, it might be still turned on.
So firstly try to turn it on normally holding your power button for about 3 to 5 seconds, if nothing seems to happen you need to force-shutdown first, for it: hold your power button for about 10 to 15 seconds. After that your tablet should be powered down, proceed to turn your tablet on. VOILA!!, good work guys.!
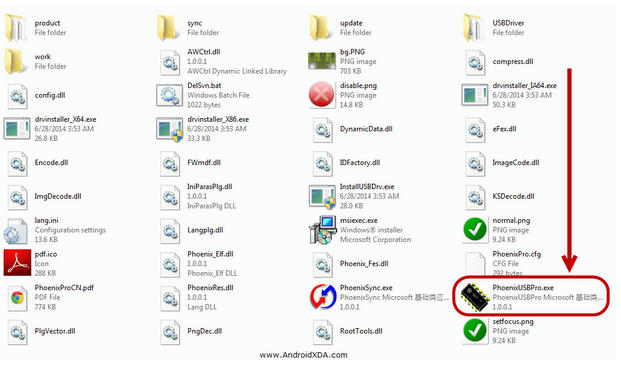
phoenixusbpro flashing guide for new user
Here im adding something for new user with pic
1st Downlod Letest Flasher From here
NT: Letest Phonixcard also can flash a23 available on following link
Here we go Phoenixusbpro flashing guide :
1. open phoenixusbpro folder and open PhoenixUSBPro.exe
[for win 7 user run as Adminishtrator ]

2.Click no key bottom from top

3. select key file from phoenixusbpro key folder [ only for 1st time farther when you use it will auto detect key file ]

4.now click to image button and select downloded firmware


5.now after select image click to start button

6.after select start you will see a green trick mark at and of left side
this mean all ok you are ready to flash your tablet

8.final stage you have to force tablet in flash mode by key combintions [its same as livesuit flashing stage ]
HOLD on vol + or - key then connect usb to tablet and quickly keep pressing power button few times 10-15-20 you will see flashing process started software will detect your tab usb
and wait for finished massage


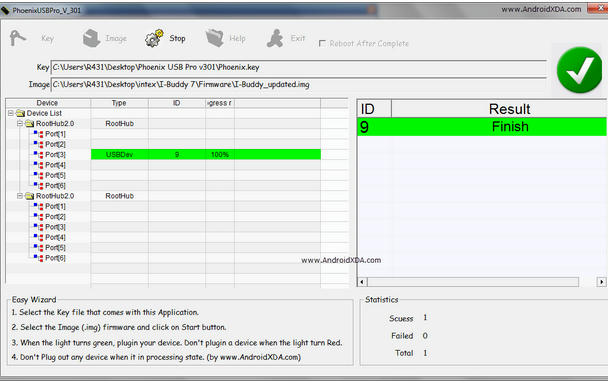
All done now disconnect and power on your tablet 

XperiFirm ~ Xperia Firmware Downloader [v4.7.4] Download here

XperiFirm ~ Xperia Firmware Downloader [v4.7.4] Download here


Since XperiFirm 4.5.3 a file called "fwinfo.xml" will be created by XperiFirm inside the firmware's folder!

This file is used by Flashtool 0.9.18.6 to create an FTF for you automatically. Download here

UPDATE YOUR FLASHTOOL TO 0.9.18.6 or else, flashing your firmware will fail with an error!

XperiFirm...
...Lets you download the current firmware for all Sony/Sony-Ericsson smartphones and tablets running Android, mostly of the Xperia line.

CHANGELOG:
v4.7.4 [August 28, 2015]:
- ATTENTION: XperiFirm now targets .NET Framework 4.0! Delete the "XperiFirm.exe.config" file!
- NEW: Sony has a few corrupted firmware. Now XperiFirm will prevent you from downloading them and will ask you to inform Sony Xperia Support to solve this for you. Kindly, do so.

v4.7.3 [June 22, 2015]:
- FIX: Fixed a minor but highly annoying bug that appeared when selecting a device (it selected another device instead). The device list is now focused on program launch again.

v4.7.2 [June 1, 2015]:
- FIX: Finishing touches: UI on Mono was basically fixed, the text is now presented correctly.
- FIX: Fixed an issue with the new code design related to devices which share the same model (C6916). Note: You might need to set some of your Favorites again.

v4.7.1 [May 31, 2015]:
- MINOR: Annoying visual bug fixed. Re-releasing because couldn't find any other problems.

v4.7.0 [May 31, 2015]:
- NEW: XperiFirm has a new look, made especially to be beautiful on Windows 10.
- NEW: "Favorites" were added! Right-click on a model in the devices tree to add to favorites, and right-click on a model in the favorites tree to remove from favorites! [Requested feature]
- FIX: XperiFirm was internally redesigned to fix some issues and add these features. Please report if anything goes wrong with the new code.
- MINOR: XperiFirm is now more specific if the unpacking fails due to long file paths.

DOWNLOAD LINK :


Source : forum.xda-developers.com

Intex Aqua Style VX Hard Reset or Pattern Unlock done

Intex Aqua Style VX Hard Reset or Pattern Unlock done


This tutorial tested by me without any risk, just need to remember some impotent notes for data, if you use this tutorial then remember first if you use this tutorial then you can't save data like contacts, mp3, videos, photos because this is factory reset so remember this topic because impotent this step and also check your device battery if low so you can't use this tutorial and check also volume up and down key and power because if this tutorial use then need to three keys for hard reset. You can done problem like Pattern lock, restarting problem, hang on logo, security lock from this tutorial.

Procedure:

1. Turn off device
2. Take out battery and insert again battery
3. Press and Hold Power key 3 second + Volume Down button until android logo

4. Press Volume Down key to Recovery option
5. Choose wipe data/factory reset option from Volume down key
6. Press Power button to Enter
7. Choose Yes --delete all user data from Volume Down key

8. Reboot your device

9. You are done from many locks

Intex Swift 2.2 Official flash file free download here

Intex Swift 2.2 Official flash file free download here


Must Read:
This flash file tested by me without any error working well,  you can use this flash file when your device hang on logo problem, restarting problem, security lock problem, password lock problem, pattern lock problem etc software related problem and you can use this tutorial without any box and this is free for all who know about software in mobile, impotent for flashing first must check your micro usb cable if not good then you can't flash it so check micro usb cable second check your device battery that is impotent for flashing if your device battery low so stop your device between flash so this is impotent for flash, before you flash save your data like contact, photos, videos etc because this is factory flash file so you can't save after full flash so must remember all are impotent notes.

intex_swift_2.2_v07_indian_no_sms download here

Intex Swift 2.2i Official flash file free download here

Intex Swift 2.2i Official flash file free download here


Must Read:
This flash file tested by me without any error working well,  you can use this flash file when your device hang on logo problem, restarting problem, security lock problem, password lock problem, pattern lock problem etc software related problem and you can use this tutorial without any box and this is free for all who know about software in mobile, impotent for flashing first must check your micro usb cable if not good then you can't flash it so check micro usb cable second check your device battery that is impotent for flashing if your device battery low so stop your device between flash so this is impotent for flash, before you flash save your data like contact, photos, videos etc because this is factory flash file so you can't save after full flash so must remember all are impotent notes.

INTEX_SWIFT_2.2I_V01_INDIAN_NO_SMS DOWNLOAD HERE